5 Tips for Recording Rap Lyrics In School

Recently on Charanga’s VIP Studio Sessions we’ve seen a lot more young people making Rap tracks, which is really exciting as the programme was originally designed for this purpose. It’s been amazing to hear so many original lyrics on a range of different themes, over beats that young people have made themselves using VIP.
This lead us to thinking about some of the things that young people and teachers can do to ensure you get the best results, so we’ve compiled a list of VIP’s top tips:
1. Make sure your lyrics and delivery match the tempo of the beat
Are you rapping too fast or too slow for the beat you are using? There are various ways to deal with this problem. Firstly if you want to rap faster or slower than the beat you’ve made, change the tempo of the beat to match the speed that you want to rap. Have a go at changing the BPM until you have something that feels right for your rap.
Generally VIP’s Hip Hop tutorial is a good place to start as it gives an easy tempo of 90bpm. Grime is a lot faster (140bpm), so is more technically challenging.
Otherwise you can try editing the number of syllables in each line of your rap to make them flow better. While you’re writing the the lyrics, always make sure you have the beat playing so you can practise each line/bar, to make sure it fits with the tempo.
[With a free 30-day trial login you can view VIP’s ‘A Basic Guide to Writing a Rap’ and the how to ‘Write Lyrics and Songs’ section.]
2. Setting the mic level
Voice recording can either be too loud that it becomes distorted or too quiet to hear. It is essential that before you record your voice, you make sure you are not too close or too far from the microphone you are using, and that the correct input level has been set.
All computers and devices are different, but there should always be an option to change the microphone input level. Make sure you test the signal before doing your final recording, by making a test recording. If the waveform is too big and is hitting the top of the red clip, then it will need adjusting. Equally if your waveform is too small and is barely visible, you will need to turn up your mic level or move closer to your microphone.
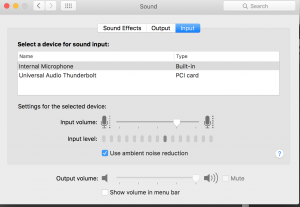
On an Apple Mac, you can adjust the input level by going to system preferences → sound → input, then changing the input level until the signal looks right (on the right).
Below: this signal is too low

Below: this signal is too high
Below: this signal is just right
![]()
3. Avoid background noise
We understand that when you don’t have a controlled studio environment to record in, it’s not always easy to avoid background noise. However, there are some things you can do to prevent too many sounds getting picked up on the recording that you don’t want.
Firstly,if possible always use headphones to listen to the beat, so that you’re not picking the music up in the recording. Secondly, use your ears to listen out for any background noises in the room that can be avoided.Finally, try to get anyone else in the room to be quiet for the few minutes that you’re recording.
Try making a big recording sign that someone can hold up when you’re recording to indicate to everyone to be silent.
4. Dealing with recording delay/latency
One of the issues with using online software is the potential to get a slight delay on the recording. Especially if you’re using an older computer, or a computer without much RAM.
There are some things you can do to reduce this and other things you can do if this is unavoidable.
Always make sure you are not running lots of other applications or browser tabs that are not essential to the recording process, as this will potentially slow down the processor. If you notice there is a delay that can’t be avoided, have a go at zooming right in and moving your recording slightly to compensate for the delay.

5. Mixing and editing your track
Make sure you’ve done everything you can to make it sound good. Use the volume level sliders to get the right balance between the voice and the backing track (see right) so that everything can be heard clearly.
It is also a good idea to cut out the extra parts at the start and the end of your recording that don’t have the voice on, so that you’re not getting any unnecessary background noise cluttering up your track.
For a more advanced mix, you can add audio effects such as EQ, compression and reverb to bring out the best in your vocal recording. These effects can be found by clicking on the FX button on the left of each channel (see below).
[With a trial login you can view VIP’s video from the Hip Hop tutorials, which gives you some tips on using effects to get the rap sounding good]Contact Melinda Robson at Charanga for more information.